

Well I was still in the D.I.Y spirit from my previous post, so I thought I shall share with you, what I like to call: The Braidy Bead Bracelet! Waheey! Exciting right? Well I am. Took FOREVER to get this up and might I say it was worth it. Firstly, the pictures were taken at night as me and my brother was doing an all-nighter because that’s how we roll. Anyway, here’s the tutorial …
You’re Helpers:

-Gold spacer Beads
-Tape
-Scissors
-Strong Adhesive (Optional)
-(I got most of my helpers from Ebay)

2. Tie a simple knot with all three strands, with a length of 3 inches ( this will be for the strap), and tape it to something sturdy – like a table.
3. Start to plait the strands forwardly (hands turn inwards not outwards), do this 10 times or your desired choice of times; though it should be an even number as it makes it easier.
4. Add the gold spacer beads to the middle and right hand strand. You want to make sure the strand in the middle came from the left hand side. Take the beads to the top of the strands.

6. Now take the left hand strand and place it over the middle strand.
7. Then place it on your index finger, again making sure the beads are in the middle.
8. Pull all three strands to tighten the beads position to give the design. NOTE: for this style you will have to pull it really tight.

10. Take the stand on the left and place it over the middle strand but make sure the bead is in between the left and middle strand.
11. Now take the strand on the left and bring it over the middle strand.
12. Okay, I have just realised the picture for this is wrong due to my insomnia *yikes*. The bead is supposed to be on the outer side on the right, not in the middle. Just like step 7, place it on your index finger (or whichever finger suits you).
13. Pull all three stands tightly to get this design. Then start plaiting again. NOTE: You should choose a certain number of plaits to do in between each set of beads to give a neater look, in my case, it was 14.
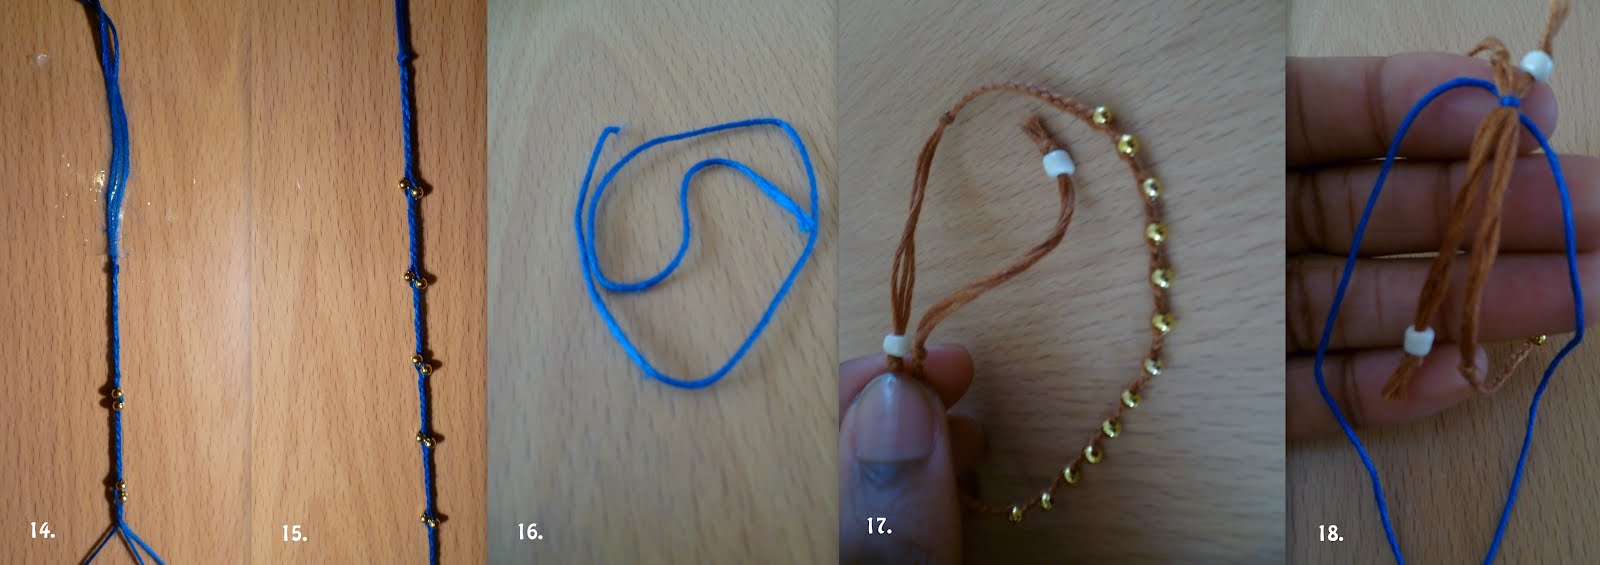
15. Once you have reached your wrist length, it should look like this! Excuse me for the bad camera angle, oh dear. You can’t see it, but I knotted the end where the plait finished, cut the excess thread to 3 inches.
16. So guys, as you can see I did this part in the morning, like duhh obviously I went to sleep. Anyways you need to finished the bracelet with something I like to call: The Pulley. Waheey. I did mine like this (different coloured thread) because its easier for you to understand. Choose a colour of thread and cut it to 12inches.
17. Now position the bracelet so the two ends of 3 inches are opposite each other and hold it in your preferred hand with the end of one side and start of the other side. Make sure the back on the bracelet is facing the inside and the front on the outside.
18. Tie a double knot making sure the knot is on the inside of the bracelet.

20. Turn the bracelet to the inside and the back should look like this.
21. Now tie a very very very tight double knot. If you want to be on the safe side, you can put some glue where the knot. NOTE: this is optional.
22. Cut off the excess thread and your bracelet is ready to join your wrist!

Dudes, I hope you enjoyed this tutorial. Mix things up by using three different colour threads or beads and mix up the designs to make it more funky. I think they look the bomb diggidy as arm candy, so cute. I love these! Well its until next time Earthlings - Alas!
Live Long and Prosper Dudes ♥
With Love, Sharrie xXx
FUN! LOVE that you made a bunch in different colors, and love the little gold beads!
ReplyDeleteLet's follow each other!
XOXO
-Daisy Nguyen from PS BANANAS fashion blog:
http://psbananas.com
BLOGLOVIN
FACEBOOK
Thank you so much - Glad you liked it and we shall ;)
DeleteSharrie xXx
Love this idea so much! You two are so funny and cute, I've read all of your posts! Oh and thank you so much for your lovely comments! They made my day :)
ReplyDeletePip x
Thank you so much sweetie & its no problem love. Glad we did :D
ReplyDeletexXx
Nice bracelets!
ReplyDeleteThank You, Glad you liked them xD
Deletelove this
ReplyDeleteThanks Hola
DeletexXx